
Construction of a Foot Mold
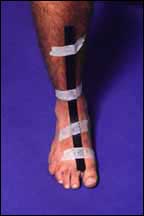
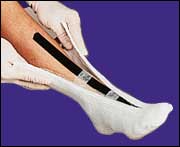
- Place the protective plastic strip over the foot and leg starting just behind the cleavage between the first and second toes, extending proximally over the dorsum of the foot, and over the anterior aspect of the ankle and leg. Hold the strip in place using three or four strips of 1″ paper tape.
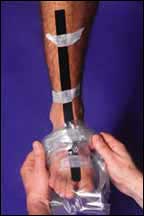
- Slip the protective plastic bag over the foot and lower leg.
- Remove the STS material from the pouch. Activate by dipping the roll in room temperature water and by squeezing the roll.
- Unroll the STS material an inch or two and stretch it open two or three times.
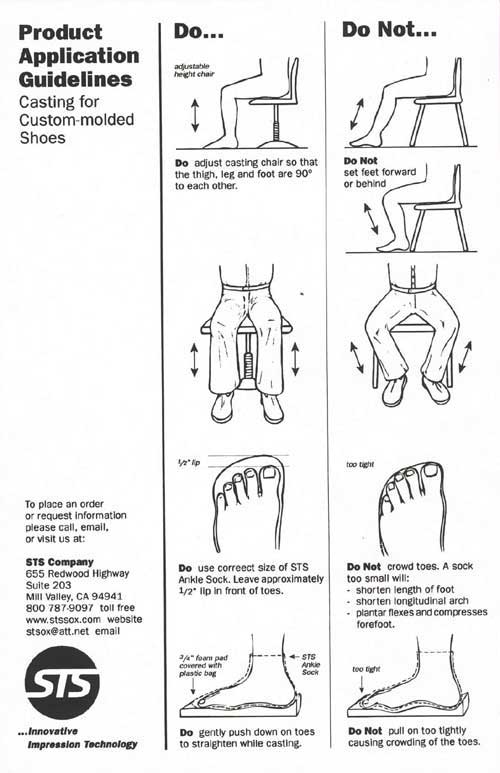
- Orient the material so the stitched end is lined up with the toes and place the sock over the toes leaving 1″ of extra material at the end of the toes to avoid causing digital deformity.
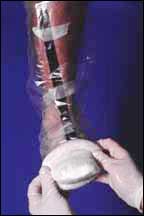
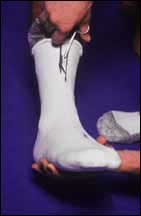
- Continue to unroll the STS material over the heel and up the leg. Massage the foot and leg area to define anatomical contours, working from distal to proximal to work out the wrinkles. Excessive wrinkling in front of the ankle area can be removed by pulling up on the top front rim to “stretch out” the wrinkles. An alternative method is to make a transverse cut in the fabric across the front of the ankle area from side to side, overlap excess material and massage the area flat. If desired, add water using a spray bottle to enhance slipperiness and accelerate curing time..
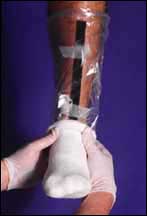
- If desired, while molding the curing STS material, place the patient’s foot on a plastic covered foam casting pad and maintain the desired position until set (approximately 3 to 5 minutes).

REMOVAL INFORMATION
- Feel the STS material to determine if any portion is uncured and feels soft or tacky. If the material feels soft or tacky, apply more water (with gloved hands) and allow additional time to complete the cure.
-
Using the specifically designed removal scissors (or electric cast cutter), with the leg in the horizontal position (toes pointing to the ceiling),cut the material beginning at the top margin, proceeding down to the toes. Keep the cut line over the underlying protective strip.
-
Feel the STS material to determine if any portion is uncured and feels soft or tacky. If the material feels soft or tacky, apply more water (with gloved hands) and allow additional time to complete the cure.
-
Remove the plastic liner from the cast and trim top margin to appropriate length with scissors.
- Place three rubber bands around mold to realign cut margins.
GENERAL INFORMATION
Intended Use: STS impression material is intended for use primarily in molding the foot for the purpose of making a shoe last. It may also be used for last duplication or fabrication of orthotic devices for the foot, ankle, and leg. Application suitability should be the responsibility of qualified personnel.
Product characteristic: STS impression material consists of a stretchy, tubular, fiberglass knit impregnated with a water curable polyurethane resin. Exposure of STS material to moisture or water initiates a chemical reaction which causes the tubular molding material to become rigid. Finished molds or lasts made from STS material are strong, lightweight and replicate the limb extremely well.
Product Storage: Each roll of STS material is packed in a sealed foil pouch. Care should be taken to avoid puncturing the pouch as this will cause the STS material to harden prematurely in the package. STS should be stored in a cool, dry atmosphere. Extremes of temperature and humidity should be avoided. Each pouch should be gently squeezed prior to opening to check suitability for application. The roll of STS material should feel soft and pliant. Do not use material that feels hard. For optimum performance, rotate stock.
Precautions: The polyurethane resin in STS material will adhere firmly to unprotected skin and to clothing. Protective latex examination or surgical gloves should be worn while handling the material. Care should be exercised to avoid contacting unprotected areas of the skin of the patient during application by using a plastic bag. Swabbing lightly with alcohol may help in removing resin from the skin if done immediately.