
Casting Sleeve Application Instruction
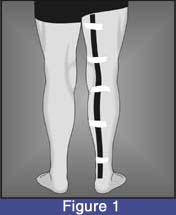
- Tape a protective cutting strip, tube or other suitable material to the skin to facilitate removal. This strip needs to be at least 30″ long, centered over the knee joint and can be positioned on either the posterior or anterior aspect of the extremity. (Figure 1)
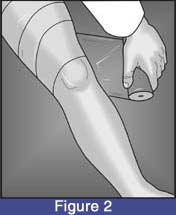
- The patient should be positioned so that the leg is well supported at the foot before beginning the casting. Use a 6″ roll of plastic wrap to encircle the extremity after it is positioned. Begin in the groin area at the proximal aspect of the thigh and apply the wrap distally to the ankle, overlapping each wrap by 3″. (Figure 2)
- After applying the plastic wrap, place the plastic bag provided over the foot. (Figure 3)

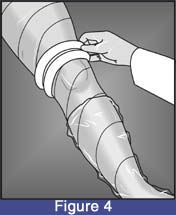
- Always wear gloves. Remove the sleeve from the pouch. Activate by dipping in room temperature water and by squeezing 5 to 6 times while submerged. (Note: The working time may be lengthened by decreasing the water temperature prior to application. Conversely, the working time can be shortened by increasing the water temperature prior to application.Orient the sleeve so that the wider portion is proximal. Slip the knee sleeve over the foot and ankle. Continue to move the entire sleeve proximally up the leg to approximately 1″ above the center of the knee. (Figure 4)
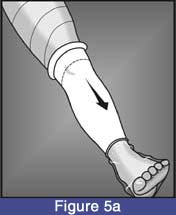
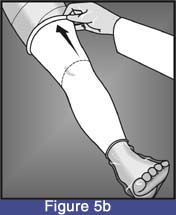
- Unroll the knee sleeve distally (Figure 5A). Then unroll the knee sleeve proximally (Figure 5B). Make certain the stitch line is centered on the patella. Always fully unroll the sock.
- Cut off any excess unrolled material as this may produce significant exothermic reaction and could result in irritation, discomfort or possible thermal injury to the patient.
-
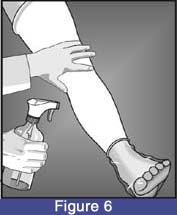
After completely unrolling the sleeve, use a water spray bottle to fully saturate the entire cast surface, working water into the resin and molding the knee sleeve around anatomical contours. (Figure 6)
-
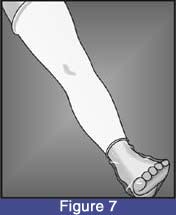
Reposition your patient either in a seated or standing position with the knee in flexion or extension as recommended by the knee orthosis manufacturer. Make sure that the patient remains still until the sleeve is hard and ready for removal. (Figure 7)
REMOVAL INFORMATION
-
Tap the mold to determine if there are any uncured “soft spots”. Apply more water (with gloved hands or spray bottle) and allow additional time to harden if necessary.
-
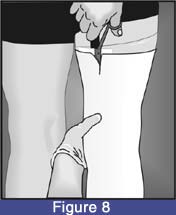
The cast should be ready for removal in about six minutes from the time it was initially dipped in the water. Remove the cured sleeve using the special scissors. Make sure to cut over the protective cutting strip. (Figure 8)Use minimal pressure if using an electric cast cutter to avoid cutting through the underlying protective strip.
-
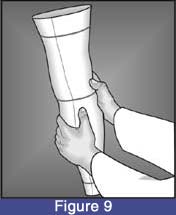
Remove the cast and then re-approximate the edges holding them in place with rubber bands. (Hot melt glue can be used to “weld” the cut margins together). Stuff the inside of the cast with crumpled paper or similar material to reinforce it for shipping. It is now ready for immediate shipping. (Figure 9)
SIZING INFORMATION
STS Knee sleeves are packaged 5 sleeves per box. The Knee Sleeves come in 2 sizes determined by the thigh circumference. Each Box contains 5 Knee sleeves and 5 plastic baggies.
KNEE SLEEVE |
|||
|---|---|---|---|
|
Item No. |
Size |
Description / Measurements |
Thigh Circumference |
| 800-S | Small | Small knee sleeve | Less than 24″ |
| 800-L | Large | Large knee sleeve | Greater than 24″ |
GENERAL INFORMATION
Intended Use:
The STS Knee Casting Sleeve is intended for use primarily in molding the leg, knee and thigh for the purpose of making an impression for use in fabrication of custom knee braces and lower extremity orthotic devices (KAFO). Application suitability should be the responsibility of qualified personnel.
Product characteristic:
The knee impression sleeve consists of a stretchy, tubular, fiberglass knit impregnated with a water curable polyurethane resin. Exposure of the material to moisture or water initiates a chemical reaction that causes the tubular molding material to become rigid. Finished molds or lasts are strong, lightweight and replicate the limb extremely well.
Product Storage:
Each roll of the material is packaged in a sealed foil pouch. Care should be taken to avoid puncturing the pouch, as this will cause the sleeve to harden prematurely in the package. The product should be stored in a cool, dry atmosphere. Extremes of temperature and humidity should be avoided. Each pouch should be gently squeezed prior to opening to check suitability for application. The impression material should feel soft and pliable. For optimum performance, ROTATE STOCK.
Precautions:
The polyurethane resin in the knee sleeve will adhere to unprotected skin and to clothing. Protective latex examination or surgical gloves should be worn while handling the material. Care should be exercised to avoid contacting unprotected areas of the skin of the patient during application by using plastic wrap and a plastic bag.
Swabbing lightly immediately with alcohol may help in removing resin from the skin.
It is very important to smooth out all wrinkles and not overlap the material before it cures. Excessive heat caused by overlapping may cause irritation, discomfort or possible thermal injury to the patient.